Using password autofill with Xamarin.Forms
June 12, 2019
xamarin
iOS 12 and Android 8 brought a simple and useful feature called the password autofill framework. Even though integration of this feature doesn’t require significant efforts, many Xamarin.Forms applications still haven’t adopted this. In this post I’ll show you how you can enable the Password Autofill feature for your app with little effort.
Autofill effect
Xamarin.Forms.Effect is aт extremely flexible way to get access to native view properties without sub-classing Xamarin.Forms views and writing huge custom renderers. In our case, the Effect would look something like this:
public class AutofillEffect : RoutingEffect
{
    public AutofillContentType Type { get; set; }

    public AutofillEffect() : base("PasswordAutofillSample." + nameof(AutofillEffect))
    {
    }
}
The AutofillContentType is an enumerable type that lists all the supported autofill entries. In fact, iOS and Android support various types of input fields, including credit card information and even 2FA OTP codes, but in our sample we will only use username and password:
public enum AutofillContentType
{
    None,
    Username,
    Password
}
Now we can use this effect on our login page. Let’s attach them to the username and password entries:
<Entry
    Keyboard="Email"
    Placeholder="Email...">
    <Entry.Effects>
        <local:AutofillEffect
            Type="Username" />
    </Entry.Effects>
</Entry>
<Entry
    IsPassword="true"
    Placeholder="Password...">
    <Entry.Effects>
        <local:AutofillEffect
            Type="Password" />
    </Entry.Effects>
</Entry>
The platform-specific implementation of the effect is simple and short, however you have to make sure you do not call an API that doesn’t exist on this particular platform.
iOS effect implementation:
[assembly: Xamarin.Forms.ResolutionGroupName("PasswordAutofillSample")]
[assembly: Xamarin.Forms.ExportEffect(typeof(AppleAutofillEffect), "AutofillEffect")]
...
public class AppleAutofillEffect : PlatformEffect
{
    protected override void OnAttached()
    {
        var effect = (AutofillEffect)Element.Effects
            .FirstOrDefault(e => e is AutofillEffect);
        if (effect != null
            && UIDevice.CurrentDevice.CheckSystemVersion(11, 0)
            && Control is UITextField textField)
        {
            switch (effect.Type)
            {
                case AutofillContentType.None:
                    textField.TextContentType = NSString.Empty;
                    break;
                case AutofillContentType.Username:
                    textField.TextContentType = UITextContentType.Username;
                    break;
                case AutofillContentType.Password:
                    textField.TextContentType = UITextContentType.Password;
                    break;
            }
        }
    }

    protected override void OnDetached()
    {
        if (UIDevice.CurrentDevice.CheckSystemVersion(11, 0)
            && Control is UITextField textField)
        {
            textField.TextContentType = NSString.Empty;
        }
    }
}
Android effect implementation:
[assembly: Xamarin.Forms.ResolutionGroupName("PasswordAutofillSample")]
[assembly: Xamarin.Forms.ExportEffect(typeof(AndroidAutofillEffect), "AutofillEffect")]
...
public class AndroidAutofillEffect : PlatformEffect
{
    protected override void OnAttached()
    {
        var effect = (AutofillEffect)Element.Effects
            .FirstOrDefault(e => e is AutofillEffect);
        if (effect != null
            && Build.VERSION.SdkInt >= BuildVersionCodes.O
            && Control is EditText editText)
        {
            editText.ImportantForAutofill = Android.Views.ImportantForAutofill.Yes;
            switch (effect.Type)
            {
                case AutofillContentType.None:
                    editText.SetAutofillHints(autofillHints: null);
                    break;
                case AutofillContentType.Username:
                    editText.SetAutofillHints(View.AutofillHintUsername);
                    break;
                case AutofillContentType.Password:
                    editText.SetAutofillHints(View.AutofillHintPassword);
                    break;
            }
        }
    }

    protected override void OnDetached()
    {
        if (Build.VERSION.SdkInt >= BuildVersionCodes.O
            && Control is EditText editText)
        {
            editText.ImportantForAutofill = ImportantForAutofill.Auto;
            editText.SetAutofillHints(autofillHints: null);
        }
    }
}
As for iOS, that’s enough!
N.B. It is preferable to use a physical iOS device to test it out. If you are on a simulator, go to settings of the simulator → Passwords → turn on AutoFill Passwords.
As for Android, you need additional code. The Autofill framework automatically detects when the login form is closed, but it can’t detect this event on Android. This happens because how Xamarin.Forms is designed under the hood and what the Autofill framework expects to happen.
On iOS each Xamarin.Forms.Page instance is basically a separate ViewController, and once the Page is closed, the ViewController is destroyed and the Autofill Framework traits it as expected. However, on Android things are different. Each Xamarin.Forms.Page is a Fragment, and all these fragments exist on a single Activity. Because the Autofill framework expects the Login activity to be destroyed once user logs in and this is not what happens with Xamarin.Forms, we have to call AutofillManager.commit() method directly right after the login process finishes:
Xamarin.Forms.DependencyService.Get<ICrossAutofillManager>().Commit();
ICrossAutofillManager is a simple interface used as a bridge to the native stuff:
public interface ICrossAutofillManager
{
    void Commit();
}
[assembly: Xamarin.Forms.Dependency(typeof(AndroidAutofillManager))]
...
public class AndroidAutofillManager : ICrossAutofillManager
{
    public void Commit()
    {
        if (Build.VERSION.SdkInt >= BuildVersionCodes.O
            && Xamarin.Essentials.Platform.CurrentActivity
                is AppCompatActivity activity)
        {
            var manager = (AutofillManager)activity.GetSystemService(
                    Java.Lang.Class.FromType(typeof(AutofillManager)));
            manager.Commit();
        }
    }
}
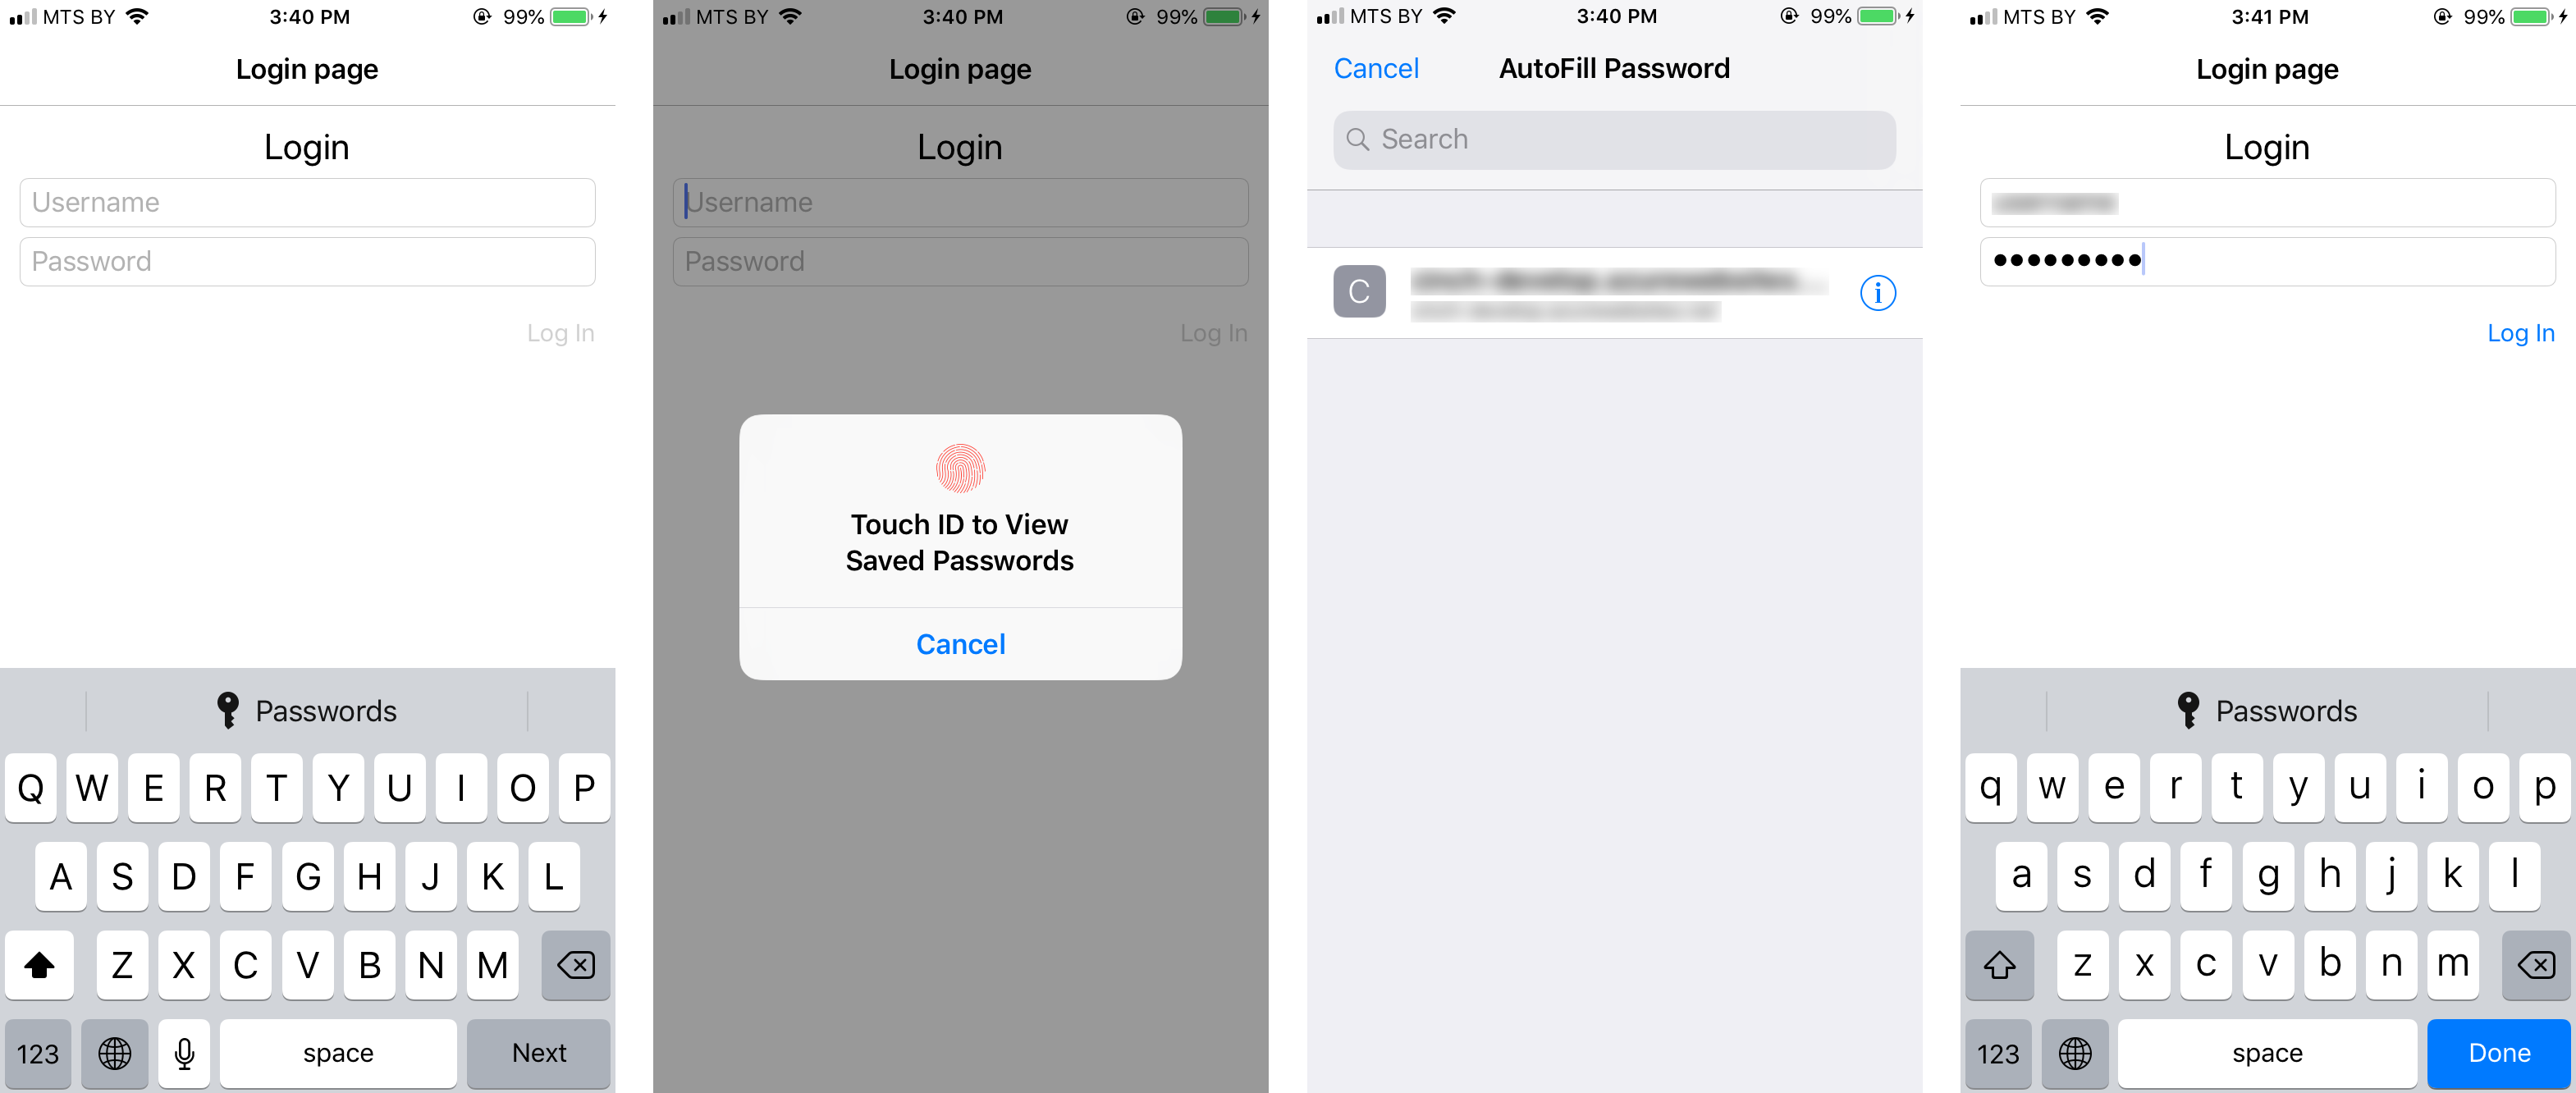
After you have added it, compile and run the application. The Password Autofill feature on Android works pretty the same as on iOS:

We are done! Another great benefit of the Autofill framework is that it can work not only with iCloud but also with third-party password managers: projects such as 1Password have adopted the Password Autofill framework, so you do not force your users to share their credentials with Apple or Google.
Domain association
What we did is fine but it’s still not the maximum what we can achieve. Both platforms provide domain-app credential sharing, which allows users to enter their credentials only once (or even never if password generator is used) and then smoothly log in into your service on any device. So, a user can create an account on Mac using Safari, then download the iOS app and log in into the app just with one tap.
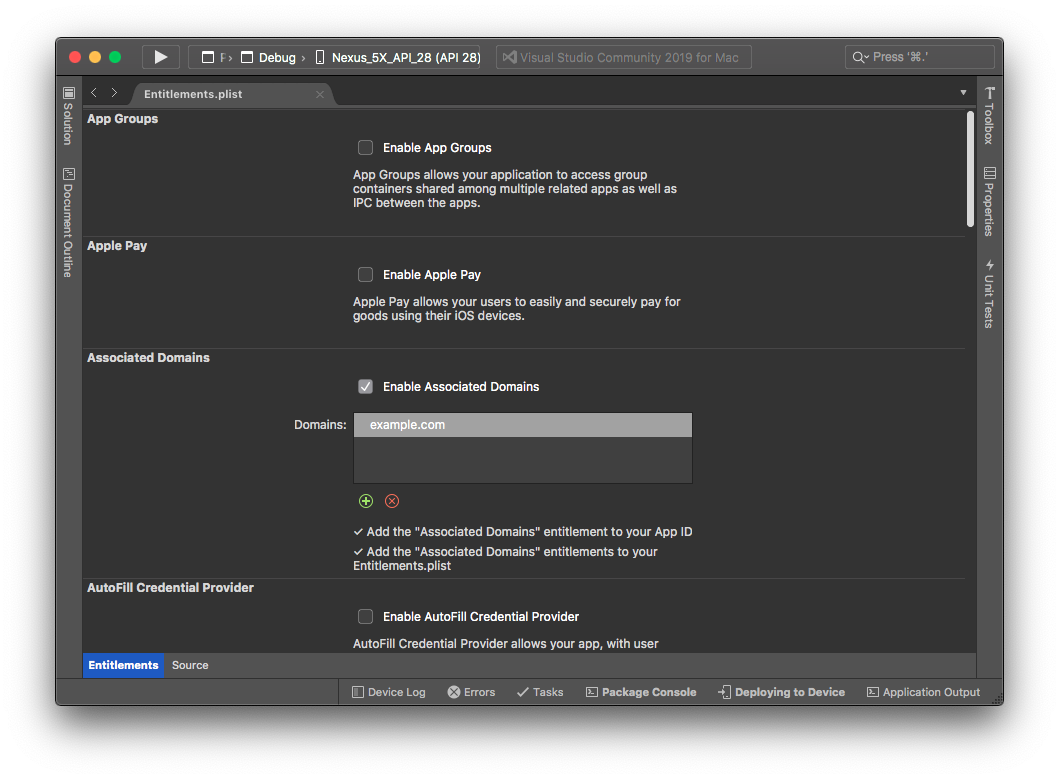
In order to achieve it, domain association should be set up. Open Entitlements.plist file in your Xamarin.iOS project and enable Associated Domains:
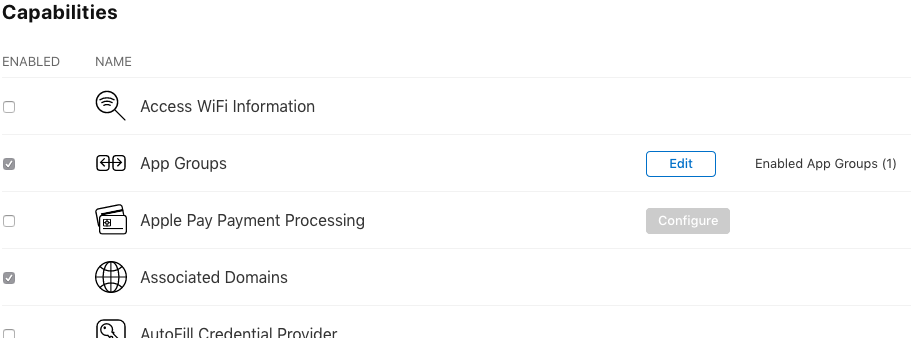
You also need to enable “Associated Domain” for your app in the Apple Developer console:
The last step is to prepare the Apple App Site association file. It is just a regular JSON file that you need to put on your server, the file’s URL should match the following format:
https://<fully qualified domain>/.well-known/apple-app-site-association
This file contains a JSON document with a dictionary that lists all applications associated with your domain:
{
    "webcredentials": {
        "apps": [
            "<Team Identifier>.<Bundle Identifier>"
        ]
    }
}
Team Identifier can be obtained from the Apple Developer portal, Bundle Identifier is set in the Info.plist file.
On Android at first you need to allow credential sharing in the app manifest. Add the following meta-data to the manifest under <application> tag:
<manifest
    ...
    <application>
        ...
        <meta-data android:name="asset_statements"
                   android:resource="@string/asset_statements" />
        ...
    </application>
</manifest>
Then you need to specify your domain: add a new string resource called asset_statements with the following content:
<resources>
    <string name="asset_statements" translatable="false">
    [{
        \"include\": \"https://example.com/.well-known/assetlinks.json\"
    }]
    </string>
</resources>
The last step with Android application is actually the same what you did with iOS: you need to prepare a special file that is supposed to be accessible from your server. The URL should be:
https://<fully qualified domain>/.well-known/assetlinks.json
And the JSON file content is:
[
    {
        "relation": ["delegate_permission/common.get_login_creds"],
        "target": {
            "namespace": "web",
            "site": "https://example.com"
        }
    },
    {
        "relation": ["delegate_permission/common.get_login_creds"],
        "target": {
            "namespace": "android_app",
            "package_name": "com.example",
            "sha256_cert_fingerprints": [ "74:A6:D8:3F:69:48:DE:96:59:40:9E:52:67:82:E7:0F:3F:E1:6B:B5:27:84:1B:2B:07:81:18:4E:2A:C7:3E:3F" ]
        }
    }
]
The package_name property is your app’s application ID specified in the manifest file, sha256_cert_fingerprints is, obviously, the SHA256 fingerprint of your signing certificate. Use the following command to generate the fingerprint:
$ keytool -list -v -keystore android.keystore
Enter keystore password:
Keystore type: jks
Keystore provider: SUN

Your keystore contains 1 entry

Alias name: ***
...
Certificate fingerprints:
	 MD5:  F4:4C:94:9B:BE:03:49:D6:BA:49:26:61:43:42:C6:C8
	 SHA1: D7:A0:A9:4C:CF:5A:5C:8D:66:60:F6:A4:0B:FE:F5:7F:AB:5F:31:AE
	 SHA256: 74:A6:D8:3F:69:48:DE:96:59:40:9E:52:67:82:E7:0F:3F:E1:6B:B5:27:84:1B:2B:07:81:18:4E:2A:C7:3E:3F
...
Once it’s done, you have to publish the Android application to the Google Play Store. This step is necessary, and if you don’t want to share the application, you can publish it to the limited Alpha channel. The ultimate step is to fill and submit the Smart Lock for Passwords affiliation form to request verification from Google.
All source code is available on Github.
Xamarin.Forms is a great instrument to build mobile apps of various complexity, but, apparently, it will be always missing some native functionality. Xamarin team did amazing work providing developers an easy access to the native things, and hopefully, using them and reading this post you have achieved what you wanted.
Take care.
Further reading:
- Password AutoFill | Apple Developer Documentation: developer.apple.com
- Autofill framework | Android Developers: developer.android.com
- Autofilling new password with confirmation in iOS 12: stackoverflow.com